Architecture of a Homemade Scientific Calculator
Posted: August 14, 2016 Filed under: Uncategorized Leave a commentWith a lifelong fascination of pocket calculators, it was only a matter of time before I decided to code up one of my own. I have a tremendous respect for those early engineers  who were able to tease advanced mathematical functions out of underpowered early electronics, so I resolved earlier this year to write my own code for a pocket scientific calculator utilizing limited hardware resources. The result is SciCalc: a single-chip pocket-sized machine capable of performing high level math (such as trig and exponential functions), using the low-cost and low-power processor. This is the first of three posts to chronicle my experience, and what I learned along the way.
Technology Enablers
Prior to the invention of the microprocessor in the 1970’s, logic devices were capable of performing only the functions that they were designed to perform. In other words, any electronic device was designed from the start to behave in a well-defined, pre-ordained fashion. This approach had two principal shortcomings. First, the function of the device needed to be fully determined before anything could be created, which placed enormous demands on the hardware engineering team to “get it right the first time”. Once the designs were sent off to manufacturing, they were literally etched in metal to perform the pre-designed function. Second, any future changes, including even fixing errors (or “bugs”) required going back to the drawing board, changing the design of the basic circuits, and retooling the manufacturing process to accommodate the changes. This introduced significant risk, time and expense. As you may expect, the more complex the device, the more expensive these changes became. So early complex digital devices (such as desktop calculators) were loaded with expensive electronics, they consumed large amounts of power, and their cost was out of reach for most people.
However, in the early 1970’s a whole new philosophy emerged to counter this conventional design approach. With the introduction of the microprocessor, which originally targeted the calculator industry, relatively simple low-cost chips were created — chips now referred to as microprocessors. Microprocessors are digital circuits which have the ability to read “instructions” out of digital memory, and perform those instructions on the fly. This breakthrough enabled the engineering of simple hardware devices without having to predetermine how the device would ultimately behave. A set of logic instructions could be created and loaded into the microprocessor’s memory, essentially giving the microprocessor its personality. The same hardware could then be re-purposed, customized, fixed and enhanced by changing only the logical instructions in memory, without any physical changes to the hardware! This breakthrough essentially launched the modern computer age, and is how every smartphone, tablet and laptop works today; note how easy it is for you to download new apps for your smartphone over the air, giving it a whole new set of features! But long before smartphones, tablets or laptops, the basis of this approach was first utilized to create battery-operated pocket-sized calculators.
So in February 2016, I turned back the hands of time and set about the task of creating the code for a new scientific pocket calculator. But before writing the code, I had decide on a home within which the code would live. I needed a processor, and some buttons.
The SciCalc Hardware
Today, unlike in 1973, there is a staggering array of microprocessor choices from giant companies like Intel (the processor in your laptop), Samsung, and Apple (the processors in your phones). But these processors are much too powerful for this exercise. To put it in perspective, the original HP-35 scientific calculator utilized a one bit microprocessor, with room for 750 instructions. The processor in an entry-level iPhone 6 is a sixty four bit microprocessor, with room for sixteen billion instructions! Hardly a fair comparison. Of course the processors used in the early calculators are no longer available, but clearly the high-powered modern alternatives would have taken all of the fun out of the project. To replicate the feel of the good ol’ days, I needed a processor which had limited capability, and which would run for months or years on a single button cell battery.
After studying the available options, I decided to utilize an eight bit microprocessor from Atmel, a local silicon valley company. Founded in 1984, Atmel has built an entire company around simple, low-cost and low-power processor chips. The chip I selected has on-chip storage room for about 32,000 instructions (the ATmega328P chip). This is still more powerful than the microprocessors used to create early scientific calculators, but it has no where near the capacity of modern chips in our phones and laptops. It is also very frugal with electrical power, and if carefully programmed, should be able to stretch battery life to many months. One side benefit in selecting Atmel is that they also supply microprocessors for the extremely popular Arduino series, which means easy accessibility of prototype circuit boards and an off-the-shelf development environment.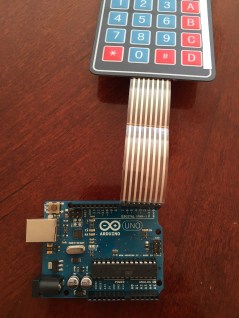
So with the processor selected, I set about building an early version of my SciCalc software using the Arduino prototype board. The early versions of my code took input from a small off-the-shelf keypad. I began by writing the code to read the keyboard and drive the
display, then I built the simple calculator functions — add, subtract, multiply, and divide. Once I accomplished the basics I then got to work on the more complex functions — sine, cosine, tangent, square root, and exponential (I will spend more time on the math behind the techniques I used for these advanced functions in my next blog post).
But beyond elegant math and intuitive operation, I was also interested in the physical design of the calculator hardware itself. After all, it was my love of the early Hewlett Packard scientific calculators whi ch led me here in the first place, and much of the appeal is in their industrial design — including their bright LED displays, tactile keyboards, and pocket-sized shapes. I clearly needed better hardware. Thankfully I found an excellent device: the Spikenzielabs Calculator Kit. Although it comes preloaded with minimal software, the hardware is fantastic. It includes a six digit LED display, 17 “clicky” keys, and it contains the same Atmel ATmega328P chip used by the Arduino (see processor schematic below). As it turned out, this is the perfect platform for my modern scientific calculator. As you’ll read in future posts, with some clever keyboard tricks and a few weekends of coding, I completed exactly the experience I had hoped for.
Spikenzielabs ATmega328p Hardware Platform

(check out our personal website here: curd.net)
Designing a Scientific Pocket Calculator in 1,465 Easy Steps
Posted: February 12, 2016 Filed under: Uncategorized Leave a commentAs a certifiable nerd, I have always had a fascination with pocket calculators. My first love was the “Bowmar Brain” calculator, which my parents gave to me for Christmas in 1975. I still remember my absolute amazement at entering “12345.6 x 7.89 =” and watching the glowing red display instantly flash the answer in eight glorious digits. How on earth could a tiny hand-held device contain so much magic! The Bowmar was only a “four-banger” in that it could only add, subtract, multiply and divide. However also during the ’70s Hewlett Packard had introduced the first true scientific pocket calculator — the venerable HP-35. Not only could this incredible pocket-sized machine do basic math, but it could actually compute high level scientific functions such as trigonometry, logarithms, and square roots! As unbelievable as it seemed, this little miracle was capable of these amazing mathematical feats from the palm of your hand, running for hours on three AA batteries. My family couldn’t afford the $400 it took to buy one of these in the 1970’s (the equivalent of $2,500 today!), but nevertheless I was hooked for life. This was the stuff of science fiction, and I wanted to be a part of it. What I did not understand at the time is that the innovation necessary to create these miracles would lead to the entire microprocessor revolution, ultimately laying the groundwork for every single PC, laptop and tablet computer in existence today, and not coincidentally, setting the stage for my entire career.
The key concept which made all of this possible is now known as “microcoding.” Instead of fixed, hard-wired logic which was pervasive at that time, microcoding enabled engineers to tell the machine what to do through simple logical instructions instead of physically connecting logic devices together. And these instructions could be changed relatively easily, essentially giving the hardware a new personality with each new program. This technique is very well-known now, but in the 1970’s it was an incredibly innovative breakthrough which enabled not only the creation of pocket calculators, but virtually every digital device in our lives today. Which brings us full-circle to my fascination with early calculators!
After studying some of the techniques used to create these pioneer calculators, I decided to re-create some of the magic myself. I wanted to personally experience what it may have been like to have been in that room in Palo Alto in 1970, when Bill Hewle tt turned to one of his young engineers, pointed to a massive desktop calculating machine, and said, “I want one of these things that will fit in my shirt pocket,” with no idea of how to accomplish it. I wanted to feel the joy of seeing my microcode causing red LED digits flicker to life; and watching the entry of decimal numbers as I tap buttons and watch them scan across the display; and more importantly, the struggle to coax advanced transcendental math functions out of tiny amounts of memory and computing power. To me, this seemed tantamount to building the Great Pyramid of Giza! So at the beginning of February I began dedicating a few weekends and several late nights to accomplishing this challenge — and what I learned was remarkable.
Over the next few weeks I will blog about this experience, from start to end. I will begin with an overall design, touching on both the high-level organization of the microcode,  and strategies related to the hardware upon which the microcode depends. In the next installment I will share what I learned about the “user interface”: reliably reading keypresses and number entry, managing the LED display, and the surprising complexity associated with adapting the binary numbers used by the processor chip into a display readable by humans. And in the final installment, I will share my experiences learning how to perform high-level advanced math using estimation techniques developed in 1716!
(check out our personal website here: curd.net)
